Exile
Last updated 2016/03/22
Return to the Suffield Academy Network Documentation Homepage
A printable version of this document is also available.
Introduction
This document describes the motivation, design, configuration, and use of the Exile shaping application. In brief, the software is designed to fairly distribute internet bandwidth to clients on a network by penalizing ("exiling") those who use more than their fair share.
Note: this software is not a content- or filter-based solution, and so may not be appropriate for your needs. Please read the Design section of this document for more information.
In a hurry? Feel free to skip the History section of the document if you don't need to know why we started this project. However, please do read the Design portion of this document, as it contains important details about how the software works.
Synopsis
In short, the software works by keeping track of all the bandwidth used by every host (IP address) on your network. If a host crosses a threshold of traffic (which you set), they are "exiled" to a lower tier of service. This in turn allows hosts that haven't used up their "fair share" of bandwidth to have better access to the bandwidth that is available. There are multiple thresholds and tiers, so hosts may be exiled to different tiers depending on how much bandwidth they hog.
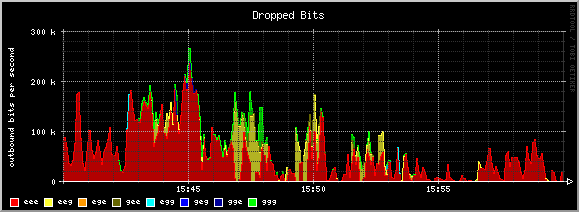
To help show this, consider the following graphs from our production system:
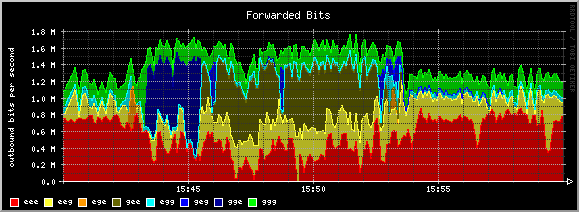
The colors range from green (no penalty) to red (maximum penalty). Note that at the beginning (15:40), much of the bandwidth is being used by exiled users. However, at 15:42 a new host starts using bandwidth. Because this new host doesn't have any penalties against it, it receives better access to the bandwidth.
You can see this because the amount of bandwidth given to the penalized users (in red) goes down to "make room" for the unpenalized user (in green). Additionally, looking at the "dropped bits" graph, you can see that the system favors dropping packets from the queues with larger penalties (red).
As time goes by, the new host begins to exceed the thresholds we've set, and they start to fall under increasingly severe penalties (first blue, then yellow). Thus, the system adapts over time to respond to users who hog bandwidth. Had this user continued to exceed the thresholds we had created, they would have eventually fallen into the maximum penalty queue (red) and stayed there until they stopped hogging bandwidth.
Again, the goal of the system is to try to make things "fair", in the sense that hosts who hog bandwidth should be penalized relative to other hosts who behave well. Please read on (especially the Design section) for more detailed information about how the system works, its strengths, and its limitations.
History
Like most residential schools, Suffield Academy suffers from a shortage of Internet bandwidth. Educational and recreational use of the network soak up bandwidth, and solutions that may work in the corporate world (strict filtering or blocking) don't work when users are in a residential setting.
Various solutions exist for prioritizing network traffic to improve (perceived) performance of the link. Suffield has tried several, with varied results:
- PacketShaper and MasterShaper
- Works by analyzing traffic at all seven layers of the OSI model. Allows prioritization/limiting of traffic on a per-application, per-port, per-address, or per-session level (among others). Very fine-grained control, and the application-layer sniffing prevents some port-hopping by malicious software.
- BandwidthArbitrator and NetEqualizer
- Works by analyzing traffic and "penalizing" bandwidth hogs. As the pipe fills up, penalties are cranked up in order to keep bandwidth utilization at a reasonable level. The basic version is GPL and freely available; the company also sells a ready-made appliance under the NetEqualizer brand.
- QoS or Priority Queuing (various implementations)
- Many firewalls and routers now support at least a basic level of prioritization. While not as sophisticated as layer-7 shaping tools, it's cheap (included), and doesn't require extra hardware. Unfortunately, it only really helps with broad classifications (give entire IP blocks priority over others), as distinctions at the port or application level aren't always practical or possible.
Initially, we favored shaping solutions based on the inspection model. This gave us lots of control over "bad" applications (peer-to-peer, mostly), and kept the network running smoothly for "real work". Unfortunately, the "bad" software continues to try and evade detection through various means (port hopping, encryption, or impersonation). Effective filtering requires up-to-date signatures, and also a lot of horsepower to scan all the traffic.
In the case of free solutions (MasterShaper), keeping the filters up-to-date and tuned correctly proved difficult. In our initial tests, it failed to spot certain key types of traffic that we wanted to filter. On the commercial side, PacketShaper kept up reasonably well with new filters, but as our pipe to the internet got faster, the licensing costs soared.
We then evaluated the Bandwidth Arbitrator. It took a different approach to managing bandwidth. Rather than try to filter every possible use of the pipe, it worked to make sure that users weren't using more than their "fair share" of the bandwidth. The machine uses the Linux kernel (with modifications to the bridging code) to track usage and apply "penalties" to connections that appear to use too much bandwidth. We tested the system out for a few weeks, with mixed success. We used the GPL version of the software, which came with no support and spotty documentation. The device did run, and it did limit overall bandwidth use. However, it failed to make a major improvement in overall latency, and it was somewhat frustrating to administer. Finally, the documentation was not clear enough on how to configure the device for our specific network (it recommends leaving the settings alone and letting the software decide what to do, but it didn't seem to be doing well enough for us). E-mails to the authors were not returned.
Faced with this, we decided to implement our own system. Convinced that application-layer filtering would only get more difficult over time, we modeled our system on the Bandwidth Arbitrator, though it works on a slightly different principle and is configured in a different way. Please read on for more information.
Design
This software operates under a few fundamental principles:
- There exists a shared link (which may be asymmetric) which can become oversubscribed.
- Individual users should be free to use most (or all) of this bandwidth without restriction, so long as there is bandwidth to spare.
- Users who take up more than their fair share of bandwidth should be given lower priority in the future, and possibly have additional restrictions placed on them.
- No content or port analysis is performed.
That last one is important - go back and read it again. Basically, the software takes a very direct approach to managing bandwidth: you get a certain "fair share", and if you go over that you get penalized. If you want to use all your bandwidth up on P2P applications, that's fine, but don't expect your online games to have a decent ping time. We don't care how you spend your bandwidth, and by working this way we free ourselves from worrying about filtering every single type of traffic.
If you need a solution that will prioritize traffic based upon destination, port, or application, use something else. The purpose of this software is to improve the overall performance of the link, but it is completely content-agnostic. If you want to prevent users from running P2P apps, you need something else.
Requirements
The exiler software is written to uses existing open-source projects to accomplish its tasks:
- Perl 5.8+. Other versions of Perl may work as well; the features used by the scripts are not terribly esoteric, and the required modules are easy to find.
- OpenBSD 4.0 (the base operating system). We use OpenBSD because it has a built-in packet-queuing system (ALTQ - part of the PF package). Other versions of OpenBSD should work just as well, and it's possible that systems using PF (such as FreeBSD) may work, though this has not been tested.
- Net::Pcap (for traffic capture). This is a Perl module which interfaces directly to the pcap libraries on your system for capturing packets. The script uses this library to capture traffic. OpenBSD 4.0 includes a pre-packaged version of this library in its packages tree.
- Unix::Syslog (for log messages). This is a Perl module which allows logging information to be sent directly to the system. Because the script includes a mode that auto-daemonizes, we include this functionality to automatically log messages. For vehement anti-sysloggers, the logging code is highly centralized and easy to disable, so this software isn't vital to the function of the software. OpenBSD 4.0 includes a pre-packaged version of this library in its packages tree.
Hardware requirements are a little trickier; the primary concerns are having enough processing power to analyze the traffic in real-time, and having enough bus speed to bridge the packets without slowing them down unnecessarily. Memory is not a major concern (scales linearly with the number of active IP addresses), and disk space is almost an afterthought (a base OpenBSD install + 10MB should do it). To this effect, you should concentrate on getting a machine with a fast processor, good NICs, and a solid interconnect (e.g., PCI-X).
You'll need three network interface cards (NICs). One is used for interfacing with the system (Unix hackers can eliminate this NIC if they want), and the other two are used as in/out for the pass-through connection. The two bridge NICs should be as high-quality as possible; some old or cheap NICs flake out when bridged or run under heavy load. Again, YMMV.
As a single data point, consider our system: we have an asymmetric connection that is 16Mb/s inbound and 2Mb/s outbound, and approximately 500 users. We run the script on a 2.4GHz Intel Pentium 4 with 512MB of RAM. We have two gigabit PCI NICs for the bridge, and a no-name 100Mb NIC for management. The system uses about 15-20% of its CPU time for the shaping (about half of that is processing interrupts), and RAM usage for the script is usually well under 16MB.
As always, each installation will have factors that affect performance. The major impacts on this system are:
- Packets Per Second: processing is performed on each packet, so the number of packets per second is more important than raw throughput (in other words, lots of little packets is worse than fewer big ones, even if throughput is lower).
- Number of Users: the script tracks each distinct IP it sees during a sample period. The more users you have, the larger the data structures get. Perl was built for fast hash accesses, so performance is good. More users means more time spent processing.
- Number of Connections: the script also tracks connections from users on the LAN with remote addresses (in order to penalize users who open too many connections). However, tracking these connections takes time and memory. If you do not wish to track connections, you may wish to comment out the portion of the script dealing with connection tracking.
Theory of Operation
The software's main goal is to watch the network traffic and assess penalties ("exile") users who cross certain thresholds.
The software runs on a machine configured as a bridge. Normally, a bridging machine simply duplicates all traffic from one interface onto another. In this case, though, the machine filters some of this traffic using OpenBSD's PF-based queuing.
By default, we use a 3x3 setup: there are three different samples that we draw (seconds, minutes, and hours), and for each sample, there are three thresholds (good, bad, and evil). Thus, there are 3*3*3, or 27 possible states that a user's traffic can end up in. There is nothing magical about this number; we could have only 2 decisions at each level for a total of 8 states, for example. However, one driving consideration is that OpenBSD supports only 62 queues for traffic (unless the kernel is recompiled), so we strive for a number that falls within this limit (remember that we have to worry about both inbound and outbound traffic, so we actually have 2 * 27 or 54 queues in the default configuration).
The software listens for traffic using Net::Pcap, and keeps
statistics for each sample time (by default 9, 180, and 3600 seconds).
Each time it draws a sample, it checks the total traffic for every IP
address that has transmitted during that time, and compares it to the
thresholds for that time interval. IPs are then assigned to queues
based on the thresholds they exceed.
All of this is performed by the script automatically. The administrator must configure the thresholds and penalties associated with each sample. For example, a threshold might be something like "average traffic greater than 60kb/s". This threshold could be applied to a particular sample, such as "inbound traffic, 9 second sample", or "outbound traffic, 3600 second sample". In this way, the administrator determines what a "reasonable" use of the link is, and has some control over how strict depending on the time limit (for example, shorter sample intervals might allow more average traffic, to account for burstiness in short transfers).
The administrator also assigns penalties for each threshold. These penalties can be percentage-based (relative to the amount of bandwidth the link "should" get if there were no penalties), or absolute. There are three types of penalties, based on the Hierarchical Fair Service Curve parameters: realtime (guaranteed bandwidth), linkshare (probability that a queue will be given excess bandwidth), and upperlimit (cap on the amount of bandwidth a queue may ever use). By specifying these parameters, the admin can give lousy service (via realtime), lower priority (via linkshare), or throttling (via upperlimit) to a queue.
This document does not serve as a detailed introduction to HFSC; please visit the following pages for more information:
- http://www.cs.cmu.edu/~hzhang/HFSC/main.html
- http://marc.theaimsgroup.com/?l=openbsd-pf&m=110488079304643&w=2
- http://wiki.pfsense.com/wikka.php?wakka=HFSCBandwidthShapingNotes
- http://www.probsd.net/~exile/hfsc.pf.conf
- http://www.monkey.org/openbsd/archive/misc/0402/msg00666.html
The software runs as a daemon on the machine, running through the process described above.
Because the software integrates tightly with PF, the script includes modes for auto-generating configuration files for PF.
Installing OpenBSD
Exile is developed and tested on OpenBSD. As part of the installation of the software, you may need to install OpenBSD on the machine that will filter the traffic. If you're well-versed in OpenBSD, feel free to skim this section to make sure you have all the necessary software installed.
What follows are very cursory instructions for getting a basic OpenBSD system installed. Please refer to the official OpenBSD documentation for more information.
The instructions below are written for OpenBSD 4.8. Other versions may work as well (we aren't doing anything too fancy).
Pre-Installation Checklist
Before you start, make sure you have the following:
- A computer that supports OpenBSD (i386 PCs are very well supported)
- The hard drive of the machine must not have any other data that you wish to save (we'll be erasing it)
- 3 network interfaces. These can be seperate cards (NICs), or VLAN interfaces on one or more physical cards (as you'll see below, we bond all the physical interfaces together using LACP, and then use different VLANs to move the traffic around). Even the no-name cards tend to work with OpenBSD, but we recommend checking the OpenBSD web site and list archives to find models that offer the best performance.
- An OpenBSD installation CD (or other installation media; see the OpenBSD documentation for other options)
- A network connection to the internet, and all necessary configuration parameters (IP address, subnet mask, DNS servers, etc)
Install all the NICs into the machine (if you haven't done so already). One of the NICs will be the management interface (the one used to connect to the machine and make changes). The other two are the bridging interfaces (in/out) that the filtered traffic will cross. The bridging interfaces should be as high-quality as possible (gigabit NICs are cheap, and worth the investment), and should have the same speed (just by two of the same make and model).
Once you have all the items, proceed to the next section.
OpenBSD Installation
Booting
Boot the computer from the installation CD. A bunch of diagnostic text will be displayed as the system searches for devices on the system. Eventually, you should get a prompt that says:
(I)nstall, (U)pgrade or (S)hell?
Type I for install and hit return.
The system will ask for a terminal type; just hit return for the default.
The system will ask for a keyboard mapping; just hit return for the default.
You will be asked to make sure you don't have any data on the disk
that you want to keep (you don't, do you?). Type yes and hit
return to continue.
Network Configuration
You'll now be prompted to give a hostname to the machine. Pick one according to your system naming scheme.
You'll now be asked if you want to configure the network; say yes.
You'll be given a list of interfaces to configure. Choose the one that will be the management interface for this machine. If all your NICs are the same make and model, it may be difficult to guess which one you want. I generally pick the one with the lowest number, configure it, and move the ethernet cables if I guessed wrong.
Work through the options for the interfaces, choosing DHCP options, IP addresses, and routes as necessary.
When you return to the interface menu, enter done (we don't need to
configure the two bridged interfaces now).
Enter the domain name for this system.
Enter the nameserver(s) this machine should query.
Say yes when asked if you want to use the nameservers.
Enter the default route (gateway) for the network you're on.
Say no to editing hosts by hand and manual configuration.
Assign a root password to the machine.
You will now be asked some minor questions about the default configuration of the system. Make whatever choices fit with your usual policies (when in doubt, go with the defaults).
Answer yes when asked if you plan to use X11, but answer no
when asked if you should automatically start it (we use the X11
libraries for some packages, like rrdtool, but don't actually need to
run X).
Partitioning
The system will list all the available hard drives on the machine. Assuming you only have one drive, it should be listed in brackets. Hit return to accept the default disk as the installation target.
Answer yes when asked if you want to use the entire disk for
OpenBSD.
Assuming there are no existing OpenBSD partitions on the disk, you
will now be put into fdisk (the partition editor). You need to
create two partitions on the disk: one for the main system, and one
for virtual memory (swap).
Start by entering z to clear the partition table. Now type p
to get some basic information about the disk. The size of the disk is
displayed as partition c:. All numbers are in sectors (which are
512 bytes, or half a KiB).
In general, swap should be sized to 2 times physical RAM, though if you have a lot of RAM it can be less (OpenBSD defaults to 1.6GiB under 4.8). Leave the rest of the disk for OpenBSD. To figure out how much space to set aside, multiply your RAM size in MiB by 4096 (1024 to convert MiB to KiB, 2 to convert KiB to sectors, and 2 to be double physical memory). That will be the size of the swap partition. Subtract this number from the total, and you know how large to make your main partition.
For example, suppose I have an 80GiB drive and 512MiB of RAM. My swap partition should be 512 * 4096, or 2097152 sectors. My total disk space is 80418240 sectors, so my OpenBSD partition should be 78321088 sectors and my swap partition should be 2097152.
To create the partitions, type a. For the main OpenBSD partition,
select a as the partition name (should be the default). Use the
default offset (usually 63), and the number of sectors you calculated
above for the size (78321088 in our example). For the filesystem,
choose 4.2BSD (should be the default). For the mount point, use the
default of none.
Now type a again to create the swap partition. Choose b as
the name, use the default offset, and just hit enter for the size (it
will default to taking the remaining part of the disk). The
filesystem should default to swap, which is what you want.
Once you're done, type q to save your changes and quit.
You'll be asked (again) if you're sure that you want to destroy
everything. Make sure you're certain, and type yes.
The system will format the drive (which may take a few minutes).
Base System Installation
You'll now be asked where the base system installation files are. Use
cd if you have the base packages on the installation CD; otherwise
use http to install them via the network.
If you install via HTTP, enter any necessary proxy information when
prompted. Then, if you don't have a preferred mirror server that you
use, enter yes to show a list of available servers. When
prompted, enter a number from the list, or one of your hand-selected
servers. Provide any requested path information (or accept the
defaults if you picked from the list).
Now you'll be asked what packages to install. You should accept the defaults, which is ALL packages. If you're really tight on space you can choose to disclude certain items, but be aware that some parts of the system (rrdtool for graphing) need X11 to function.
Once you've made any package selections, type done to install
them. Answer yes to signal that you're ready, and the system will
download, decompress, and install the requested packages. Depending
on the speed of your network connection, you may want to go grab
something to drink.
When the installation is complete, the system will prompt you again
for the location of any installation media. Type done this time,
as we've installed everything.
Select a timezone for the system (e.g., US/Eastern).
A few final scripts will run, and then you should receive a message
that the system has been installed. Issue the reboot command, and
eject the installation CD.
The machine will now boot under its "own steam", and you're ready to move on to the next section.
Basic System Configuration
Your machine should now boot by itself to the login prompt. You
may now log in as root and you should get a basic command prompt.
At this point, ping a host to make sure your network is up, and
everything else seems in order. You can also make any necessary
tweaks that you usually make to the system (configuring syslog,
changing command shells, installing preferred editors and other tools,
etc.). Once you've done that, come back to this document (go
ahead, we'll wait).
For example, we like to install screen, emacs, wget, bash, and pftop.
NIC Configuration
You'll need to tell OpenBSD to bring up your network cards at boot time. The management interface should be up and running, so we need to bring up the two bridging interfaces. Because the bridge will simply pass traffic from one interface to the other, they do not need to have IP addresses, or any other configuration.
Your NICs will be listed in the output of the dmesg command; just
scan for the make of your card and it should show up with an
identifier. For example, my gigabit Intel cards show up as "Intel
PRO/1000MT", with system identifiers of em0 and em1.
Once you know the names of the bridge cards, type the following for
each one, substituting the interface name (e.g., em0) for IFNAME:
echo 'up' > /etc/hostname.IFNAME
Bridge Configuration
Next, we need to tell OpenBSD which cards to bridge together. We do
this by echoing a few commands to a special bridge configuration file
(substitute your interface names for IFNAME):
rm -f /etc/hostname.bridge0
echo 'add IFNAME1' >> /etc/hostname.bridge0
echo 'add IFNAME2' >> /etc/hostname.bridge0
echo 'up' >> /etc/hostname.bridge0
Enabling Forwarding
OpenBSD must be told to forward packets by default. To do so, edit
the file /etc/sysctl.conf and change the value of
net.inet.ip.forwarding to 1.
Enabling PF
PF is the OpenBSD Packet Filter, which includes the queuing code we'll use to slow down IP traffic. In OpenBSD 4.7, it is enabled by default.
Reboot and Check
Now that you've made all the necessary configuration changes, reboot the machine by issuing the following command:
shutdown -r now
When the machine reboots, log back in and type ifconfig. You
should see all of your network interfaces and the bridge as
"UP,RUNNING". If you see that, you're ready to move on to the next
section.
Perl Libraries
All of the Perl libraries that the script requires are available as packages for OpenBSD. Unless you feel like rolling your own, all you need to do is install the pre-compiled packages from your favorite OpenBSD mirror:
pkg_add http://openbsd.mirrors.pair.com/ftp/4.0/packages/i386/p5-Net-Pcap-0.04.tgz
pkg_add http://openbsd.mirrors.pair.com/ftp/4.0/packages/i386/p5-Unix-Syslog-0.100.tgz
That will install the Net::Pcap and Unix::Syslog Perl modules.
Wrapping Up
At this point, you have an OpenBSD machine that is correctly configured for use with the software. Please proceed to the Installation section of this document for information on setting up our software.
Installation
This section describes the installation and configuration of the actual Exile software. Note: it is assumed that you already have an OpenBSD machine with PF, bridging, and the required Perl modules installed. If you don't, please read the OpenBSD Installation section of this document and follow the directions there before installing the software.
Downloading
As this is beta software, we currently only support downloads by directly checking the code out from our Subversion repository. Don't worry; it isn't too difficult!
First, make sure you have a Subversion client installed. OpenBSD users can install a prepackaged version by running:
pkg_add http://openbsd.mirrors.pair.com/ftp/4.0/packages/i386/subversion-1.3.2.tgz
Next, move into your /usr/local directory:
cd /usr/local/
Now, you're ready to check out the project:
svn co svn://svn.suffieldacademy.org/netadmin/trunk/obsolete/exile
That will create a directory called exile with all of the software
contained inside it.
If you ever need to update the software to the latest version, move
into the exile directory and run:
svn up
Configuring
Configuration requires a few distinct steps, which are outlined
below. Please note that the conf folder contains example
configurations; you should copy these configurations to your own files
and make your changes there.
The example configurations are well-commented. Additionally,
information about the configuration parameters can be found in the
script itself (by running perldoc sbin/exiler).
Exile Parameters
Start by editing the main configuration file (we suggest making a copy of the example.conf, renaming it, and customizing this file).
The example file has detailed comments; in short, you'll need to perform the following actions:
- Specify the paths and interfaces on your system
- Define the parameters of your network (subnets and bandwidth)
- Configure the thresholds and penalties
For first-time configurations, we recommend setting $DEBUG=1.
This will cause the script to run in the foreground and print more
detailed information.
Two of the configuration variables are paths that point to the PF template and local rule files (described below). We recommend using names that are specific to your site, rather than the included "example" files. Again, make copies of the example files and rename them before customizing.
PF Template
The PF template file is a configuration file for OpenBSD's packet filter. The template allows you to define default policies, custom queues, and other rules (such as tables). Additionally, it includes macros that the script will replace with actual configuration variables.
Thus, you set up your custom rules and queues, and also insert the template macros that will expand to the rules and queues that exile uses. If you're not sure what to put, use the example template (it has a reasonable, if not highly secure, configuration).
Local PF Rules
Finally, you must create a "local" PF rules file. This script contains rules that will be executed before any of the exile rules are run. Additionally, these rules will always be in effect, even when the exile rules are not active.
You can use these rules to send certain traffic to "exempt" queues to prevent exiling, or other custom items as you see fit.
If you're not sure what to put here, use the example ruleset and customize the interface options that are specific to your machine.
Running
The script can be run in several modes, depending on what you wish to accomplish. We describe the most common modes of operation below.
Note: all the examples below assume that you are in the exile
directory (where you installed the script). For example, if you put
the script in /usr/local/exile, then you should cd to that
directory before running any of the commands below.
Also, running the script with no arguments will cause it to print a brief synopsis.
Generating Config Files
Before you can run the daemon, you must first generate the PF config files. This can be accomplished by running the script with the "gen" option:
./sbin/exiler gen conf/my-config.conf
This will parse the configuration file and build the PF configuration
files. Inspect the resulting file (which will be in run/pf/pf.conf by
default) to confirm that they are to your satisfaction.
You can test the generated files by executing:
pfctl -nf run/pf/pf.conf
If any errors are reported, you'll need to correct them before continuing (most common errors involve specifying too much bandwidth for a queue).
Note: PF may print warnings like:
the sum of the child bandwidth higher than parent
These errors are harmless, and have to do with the way that HFSC queues operate in OpenBSD. Errors that you need to worry about will say "syntax error" in them.
Now you can load the new ruleset (note that this does not turn on exiling; it just installs the framework that the exiling will plug into). Do this while logged on through a console (in case there is an error in the config, which would disconnect you if connected remotely):
pfctl -f run/pf/pf.conf
If the machine is still connected and traffic is passing normally, you are in good shape.
If you want to make your generated ruleset load automatically on boot,
add the following line to /etc/rc.conf.local:
pf_rules=/path/to/exile/run/pf/pf.conf
Listening to Traffic
Now that the PF rules are loaded, you can run the script in "listen" mode. This will run the script in such a way that it does all of its normal work, but doesn't actually assign IP addresses to the penalized queues. It's a good way to test the configuration, and ensure that the machine is fast enough to listen to all the traffic.
Run the script with the "listen" option:
./sbin/exiler listen conf/my-config.conf
If debugging is enabled, you'll see output as the script scans traffic
and adds or removes penalized IP addresses. On a separate terminal,
you can consult the files in run/q to see which addresses would
have been penalized.
Exiling
Once you're sure that your configuration is correct and listening well, you can change to "run" mode. This mode is equivalent to using "listen", but it enables the PF rules to actually assign packets to queues. You can run it by typing:
./sbin/exiler run conf/my-config.conf
Note that you must have already generated and loaded the PF configuration files.
If you prefer, you may manually achieve the same state as "run" by executing "qon" mode, and then "listen" mode. This can be useful when the script is running in daemonized mode and you don't wish to terminate it. Using the "qon" and "qoff" modes will disengage the actual penalizing process while leaving the daemon in a mode to watch traffic.
You may find it helpful to use the pftop program to watch the
queue assignments. A pre-compiled version is available for OpenBSD:
pkg_add http://openbsd.mirrors.pair.com/ftp/4.0/packages/i386/pftop-0.5.tgz
Run pftop and switch to the queue assignment screen. You'll see
real-time updates of the amount going to each penalty queue.
Additionally, we've created some scripts to graph the performance of the application in near-real-time. Please read on for more information on setting up this service.
Performance Graphing
Warning
Note: the scripts for performance graphing are still under development, and currently are coded with settings that are specific to Suffield Academy. The script should be easy to modify, but please keep in mind that they are not as simple to configure as the main application.
Overview
To track the performance of the exiler application, we've written a simple daemon that collects data from the exile queues and stores them in RRD (Round Robin Database) files. Another script queries these files and generates graphs of the performance of the application (for an example of the graphs generated, please see the Introduction section of this document).
Installation
The software uses the "rrdtool" package to perform its data capture and graphing. Thus, you should begin by installing RRDtool on your machine. There is a pre-compiled package for OpenBSD; you can install it by running:
pkg_add http://openbsd.mirrors.pair.com/ftp/4.0/packages/i386/rrdtool-1.0.49p3.tgz
Once you've install RRDtool, you can look at our scripts. If you've
checked out the exile directory from our Subversion repository,
you already have all the necessary scripts. They live in
subdirectories of the rrd directory.
There are three subdirectories of the rrd directory. Briefly:
- The
bindirectory contains the daemon script which collects data from the system and stores it in RRD files. - The
cgi-bindirectory contains a Perl CGI script which accesses the RRD files and produces graphs of the data. - The
rrdsdirectory is where the scripts store the saved RRD files (by default -- you may change the path to whatever you wish).
The exile_queue_rrds script in the bin directory should be
launched by root. It will fork to the background and begin collecting
statistics about all OpenBSD PF queues on the system. The results
will be stored in RRD files in the directory provided as the first
argument to the script.
If you like, you may add a line to launch the script to
/etc/rc.local so it begins running automatically on startup.
The exile_queues script in the cgi-bin directory must be run
from within a web server. Edit the script to provide the correct path
to the RRD files (this should be the same as the argument you passed
to exile_queue_rrds above), and then run from a web browser.
If you don't have a web server installed, you might try thttpd
(part of the OpenBSD ports collection). It's a very small and
lightweight HTTP server, and can easily be set up to run our CGI. For
example, if the exile directory is installed at /usr/local/exile,
you can execute thttpd as:
thttpd -p 80 -d '/usr/local/exile/rrd' -c '/cgi-bin/*' -u www
and be able to browse to http://yourhost/cgi-bin/exile_queues to try the script out immediately.
Customization
At this time, all the RRD scripts use hard-coded values for their configuration. If you wish to make changes, you'll need to edit the source code directly. The current values are reasonable for a machine that only runs the exile application, but if you customize the machine you may need to change a few of the settings. Anyone with some experience using Perl should be able to make the necessary changes.