Firewall (OpenBSD PF)
Last updated 2016/03/22
Return to the Suffield Academy Network Documentation Homepage
A printable version of this document is also available.
Introduction
Like most networks on the Internet, we have a firewall that acts as a boundary between our campus network and the Internet at large. We do this for the purposes of security (preventing hosts from connecting to us that should not be allowed), and also to perform router-type services like bandwidth control and network address translation.
Rather than using specialized hardware for a firewall, we use commodity PCs running the OpenBSD operating system. OpenBSD has a long track record as a secure OS with excellent support for firewalling operations. The firewalling code in OpenBSD is called PF, for "packet firewall".
As an added bonus, OpenBSD has a feature called CARP (Common Access Redundancy Protocol), which allows for hot-standby failover machines. This helps reduce downtime if a firewall needs to be rebooted.
Network Diagram
Suffield has a primary connection to the internet through the Connecticut Education Network (CEN). We are provided two class-C networks of routed addresses from CEN. Suffield's internal LAN uses RFC 1918 private addressing, and all of our machines live in this space.
We have two firewall machines: Corde and Sabe. Each has its own connections to our LAN, WAN, and a crossover connection to the other machine.
Together, these machines form a failover pair to a "virtual" firewall named Padme. It has its own IP addresses distinct from the physical machines that answer for it. To an outside observer, we appear to have a single firewall (Padme), even though there is no physical machine with this name. In reality, we have two physical machines, and one of them is pretending to be Padme at all times (which one doesn't really matter, as they're hot standbys for each other).
The following diagram shows the two machines, their interfaces, addresses, and how they create a virtual firewall:
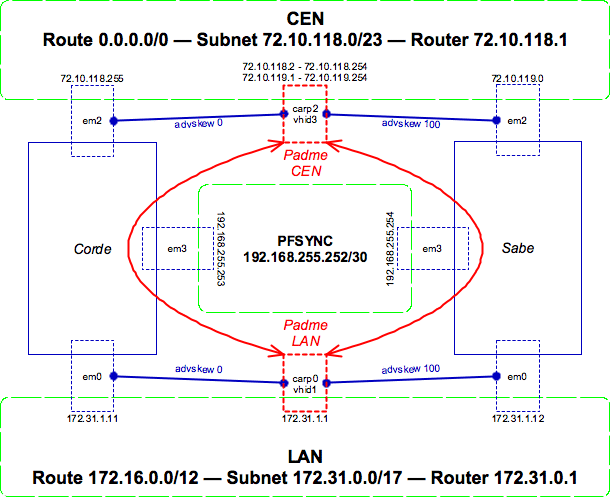
- The green boxes represent networks (such as our LAN and CEN)
- The blue lines represent physical machines and their connections
- The red lines represent virtual "machines" and their connections
- The dashed lines show network interfaces on the various machines
Essentially, each firewall has its own IP address on each of its physical interfaces (em0, em2, em3) on each network. Additionally, the firewalls each advertise "virtual" IPs on the network on their virtual "carp" interfaces. Only one machine advertises at a time, and the CARP protocol deals with the details of which machine is the master and which is the backup (the "advskew" parameter determines who is the master by default; in this case Corde is because of the lower value).
The active firewall sends state changes and updates to the backup machine via the "pfsync" network between the two machines. This network is just a direct cable attachment; it is not routed or accessible from outside of the two machines. Should the primary firewall go down, the backup will notice (via CARP) and take over where the other left off (using the state information sent via pfsync).
Note that the private PFSYNC network is only necessary to exchange firewall rule state information, not the failover of addresses. CARP works directly over the real networks (on interfaces em0 and em2 above), and doesn't need an out-of-band channel to work. However, the firewall state information does.
For more information on CARP and PF, please see:
Installation
Hardware Requirements
OpenBSD installs on a wide variety of hardware, and works very well even on "underpowered" hardware. That said, certain hardware choices can help performance.
As our machines are firewalls, network throughput is important. The OpenBSD community appears to agree that gigabit cards perform best (even for small workflows) due to their more advanced features (TCP checksum offload, larger buffers, DMA, etc.) We selected Intel dual-port server NICs for our machines (2 onboard, 2 PCIe, for a total of 4 ports per machine). Remember, you need one "inside", one "outside", and one "sync" interface at a minimum.
The firewall code runs inside the OpenBSD kernel, which is not multi-processor aware. Therefore, a dual-core machine doesn't help us. We bought the fastest-clocked single-processor machine we could find.
Hard drive space is almost negligible (600MB or so for the OS install, plus space for swap). PF keeps everything locked in RAM, so speed of the drive is not a huge issue. We did not opt for RAID, because we have two fully redundant machines (which would make a redundant drive, well, redundant...).
Install OpenBSD
If you're a seasoned pro at OpenBSD, just grab the ISO image online, burn it to a CD, and pop it in your machine. If you're less-than-seasoned, I recommend purchasing a full CD set from OpenBSD. The money goes to a good cause, and the sets come with full installation instructions.
You'll want to install the base system and any compiler packages. You do not need to install "games" or the "X11" system.
Set up the primary interface to be on a network that can reach the Internet (we used our LAN as the primary network and interface).
Once the install is complete, you should be logged in as root and
able to reach the internet from the machine.
Installing Packages
Before you start making configuration changes, you may find it helpful to download a few more pieces of software on the server. OpenBSD has a ton of precompiled packages you can install directly. If you're running on the i386 platform, here is the list for the version of OpenBSD we're using right now (4.3):
http://www.openbsd.org/4.3_packages/i386.html
Simply copy the download URL to the .tgz package, and paste it
into the following command to automatically download and install the package:
pkg_add <URL to package file>
You'll need Subversion in order to check out our config files from source control and use them on the machine:
I like to install Bash (my shell of choice) and Emacs (my editor of choice) on any machine I use:
- http://www.openbsd.org/4.3_packages/i386/bash-3.2.33.tgz-long.html
- http://www.openbsd.org/4.3_packages/i386/emacs-21.4p6-no_x11.tgz-long.html
pftop is a great utility that shows you state information, utilization, and other statistics. pfflowd turns your state information into Netflow-compatible exports, which you can graph with other software:
- http://www.openbsd.org/4.3_packages/i386/pfflowd-0.7.tgz-long.html
- http://www.openbsd.org/4.3_packages/i386/pftop-0.7.tgz-long.html
Install Subversion plus any other packages you're interested in.
OS Tweaks
To prepare the machine, we edit several of the OS configuration files to our liking. All of the files we edit are checked into source control, and so are available. You must have installed Subversion (see above) before you can get these configuration files.
Move to the root of the hard drive, and check out our config file directory:
cd /
svn co svn://svn.suffieldacademy.org/netadmin/trunk/obsolete/pf/etc.suffield
Some of these files can be used as-is, while others should be copied into place and then modified.
Static Config Files
You'll want to move the following files out of the way (rename with
with ".bak" at the end of their name, or something similar). The
files are all located in /etc. You'll replace them with symlinks
to the files of the same name in the /etc.suffield directory.
- mygate (define the router, if not already set up properly)
- resolve.conf (use our name servers)
- syslog.conf (use our local log server)
- newsyslog.conf (add our log rotation rules)
- ntpd.conf (use our local time servers)
- snmpd.conf (be sure to edit and define the password and community string)
Additionally, you'll want to do the same with the following OS config files. These files set defaults for how the operating system behaves, enables the firewall, and tweaks some performance values. All files are commented, so you can find the values we've changed from the defaults:
- sysctl.conf (twiddle kernel configuration knobs for performance)
- rc.conf.local (define options for services that start on the machine)
- rc.local (local startup of daemons installed by us)
Network Configuration
In addition to the files above, we must copy in some "template" config files and then edit them to match the machines they're being installed on.
Refering to the diagram in the Introduction, you can see which IP
addresses should be assigned to the various physical interfaces. Copy
the hostname.XXX files into /etc/, where "XXX" is the name of
a physical interface (e.g., em0). Depending on the driver
for your NIC, the names may vary. Our Intel adapters use em as
the prefix, but other prefixes (such as sk and dc) are also
common.
Edit these files to have the correct information. In most cases, we've included comments that tell you what to change and what to leave alone. The interfaces are:
- hostname.em0 (LAN)
- hostname.em2 (CEN/WAN)
- hostname.em3 (PFSYNC)
Note that the LAN interface has route statement added to it. This ensures that packets destined to our LAN get routed "inward" over that interface. Because the default route matches all packets and sends them over the WAN interface, we must add this more specific route to connect to our internal hosts.
Once you've enabled the physical interfaces, you need to activate the
virtual interfaces. Copy over the following configuration files, and
edit the information in them to match the layout of the host.
Assuming the physical interfaces are numbered and named the same as in
our setup, the only thing you'll need to chage is the password and
advskew parameters on each CARP interface. The password should
match between the two firewalls, and advskew should be 0 on the
"primary" firewall and a higher number (we use 100) on the "backup"
firewall.
The following config files define the virtual interfaces:
- hostname.carp0 (LAN virtual adapter)
- hostname.carp2 (CEN/WAN virtual adapter)
- hostname.pfsync0 (pfsync device to sync firewall states)
Note that the CARP interfaces define the addresses that the rest of the world should use. In the case of our LAN interface, we have the single address that we use for routing traffic. On the WAN side, the CARP interface advertises all IPs on that interface where we receive traffic (the firewall rules worry about routing it back to machines on the inside via NAT).
Finishing Up
At this point, all the configuration files should be in place for a complete install (including those for our firewall ruleset). Reboot the server:
shutdown -r now
To enable all the new interfaces and startup config options. Note: if you are not physically at the machine, be aware that the reboot will enable the firewall ruleset from source control, and you might be cut off from the machine. Either perform the reboot while physically at the machine, or disable the firewall rules.
Firewall Settings
The OpenBSD PF code supports many advanced options, turning it into much more than just a firewall. The system can perform other functions, such as routing, redirection, statistics tracking, queuing, and packet normalization.
If you are not familiar with PF, stop and read one of the many documents describing its use, such as the OpenBSD PF FAQ. The remainder of this document assumes you have a working knowledge of PF.
You can download the Suffield pf.conf file to see how we've done things. The file is well-commented, and should be easy to follow if you're used to PF config files. We've highlighted a few features of the configuration below.
Normalization
We use OpenBSD's "scrub" directive to fix up the packets before we process them. This includes fragment reassembly, window cropping, and other sanity checks on the packets (and is generally considered a good idea). We don't apply some of the more esoteric options, as they can cause problems with certain quirks in the TCP/IP stack on some machines.
We also set immediate block rules for "evil" packets (sourced from bogus IP space), and perform checks to ensure that packets with our private IP space only appear on our internal (LAN) interface.
Policy queueing using tags
We have a traffic shaping device on our network, so we do not perform major shaping on the firewall. However, we do set a basic cap to ensure that the traffic level stays below a reasonable level.
Our queueing rules are complicated by the fact that we have two basic tiers of service: "on-net" traffic (which can flow without limit at no extra charge to us), and regular "transit" traffic that must not exceed a threshold.
Ordinarily, we would need to duplicate all of our rules (one for each class of traffic) in order to assign packets to the correct queue. However, PF allows us to "tag" packets as they pass through the firewall, and then act on those tags later on in the ruleset.
You will note that all normal "pass" and "block" rules in our ruleset also assign a tag of "$accept" or "$reject". We can then refer back to this tag at the end of the ruleset and perform queue assignment as the last step (after all of the policy decisions have taken place).
We do not queue inbound traffic at this time, because it interferes with our shaper's policy decisions. Because the firewall comes before the shaper for inbound traffic, turning queuing on for inbound packets on the firewall would have the effect of "pre-empting" the shaper and limiting packets arbitrarily (rather than according to our shaper rules).
Static NAT for servers
Though all our machines live in our private LAN IP space, we do want some of them to be reachable from "the outside". These machines (servers, typically) live in our "DMZ" VLAN. The firewall ruleset defines a NAT mapping from a live external IP to the private internal one (for certain ports), and ensures that any outbound traffic is steered to the correct public IP.
Additionally, the policy section of the firewall rules permits traffic to these same designated ports. For a handful of servers, we restrict access by IP, but most have a global permit for the ports we want others to reach.
Round-robin NAT for users
All non-server machines are forwarded through the firewall and NATed to an arbitrary external IP address (taken from a pool of available addresses). The assignment is "sticky", ensuring that clients are NATed to the same address during a session.
Reloading the Firewall Ruleset
The firewall rules are loaded in /etc.suffield/pf.conf (kept in
version control). When you need to make changes, use the following
procedure:
- Edit the firewall ruleset on your local machine in version control.
- Check in and comment the changes
- Log on to the firewall
- Move into the
/etc.suffieldfolder - Run
svn upto get the latest version - Test the ruleset (without loading) by running:
pfctl -nf /etc.suffield/pf.conf
- If there are no configuration errors, reload the ruleset:
pfctl -f /etc.suffield/pf.conf
Note that you'll need to reload the rules on both the primary and backup firewalls. In this case, it's best to load the rules on the backup firewall first, so that any serious errors will not cause a disruption in service on the primary system. Once the rules have loaded successfully on the backup system, log on to the primary system to fetch the latest version and reload.
Tips and Tricks
Below we list some helpful commands to know about when monitoring the firewall. Some may require installing additional software, usually through the package or ports interface built in to OpenBSD.
pftop
pftop is to firewall information as "top" is to process information. It's a simple utility that shows a live snapshot of the rules on your firewall, the active states, queue statistics, and bandwidth usage.
pftop is installable through the package system in OpenBSD, and so is
very easy to get started with. Once installed, just type pftop
and you'll immediately be taken to the default screen. Use the left
and right arrows to move between reports (listing rules, states,
queues, etc.). Hit "q" to quit.
tcpdump
PF has a "log" keyword for its rules, allowing you to log packets that
match those rules. By default, logged packets go to a special device
called pflog0 (you can specify other log devices in the PF
configuration file to log certain events elsewhere).
To read this log file, you use tcpdump, just as if you were
sniffing packets off the wire. We like to see timestamps and other
information, so a sample command might be:
tcpdump -levvvttti pflog0
You can specify other options that tcpdump likes (such as -n to
leave names unresolved), and you can specify filters to limit matched
packets to only those you're interested in.
We usually run this command immediately after loading a new PF ruleset to ensure that we aren't blocking traffic that we used to allow.
Label Statistics
Our firewall ruleset makes uses of "labels", which are a statistics collection tool. Anywhere we define a label in the config file, OpenBSD collects statistics for packets that match the rule and assigns them to counters associated with that label.
You can view the counters for all labels by running the command:
pfctl -vs labels
This can be inspected by hand, or you can feed it into a script for graphing or other reporting.
Inspecting PF Config
In addition to the label statistics shown above, the pfctl utility
can show all kinds of information about the currently loaded firewall
rules, queuing, state table, and statistics. Simply run pfctl
with the -s flag and a section you wish to see information about
(such as rules or states). Adding a -v will give more
information, and usually also include detailed packet counters.
For full information, refer to the pfctl manual page.
Killing States
By default, PF "keeps state" on all accepted connections so it doesn't have to evaluate the entire ruleset for each packet (packets that match an existing state are passed immediately). However, if you make a change to the ruleset and wish to have it take effect for all connections immediately, you'll need to kill existing states.
You can do this for specific hosts or networks by using the -k
option to pfctl:
pfctl -k 192.168.0.1
That kills all states sourced by the given IP address. If you specify
-k twice, it will kill all states from the first host to the
second. You can use hosts or networks to kill multiple states:
pfctl -k 192.168.0.1 -k 10.10.10.1
pfctl -k 192.168.0.0/24 -k 10.10.10.2
pfctl -k 0.0.0.0/0 -k 192.168.0.3
Note: killing a state may cause an existing connection to be interrupted, and the end user may need to reload or reconnect their sessions. Only kill states when it is absolutely necessary to do so; otherwise, just let the states expire on their own.