Self-hosting EAP-TLS onboarding for eduroam
Do you use (or want to use) EAP-TLS for authentication to eduroam at your site? Are you interested in a highly automated means to get certificates to your users? Are you interested in not spending a lot of money to do so? Read on…
This is meant as a framework more than a step-by-step tutorial. It took several weeks to get this up and running; this document aims to provide guideposts for the major tasks that we needed to complete, fill in some gaps in the official documentation, and cover some issues that we needed to work around. There are several site-specific configurations that go into this, so this is best suited to someone who is comfortable on Linux and ready to get their hands dirty.
Please keep in mind that this deployment makes customizations to the software that are not part of the official instructions. We’ve glued together some things that (to the best of our knowledge) haven’t been glued together before, so our directions don’t apply to a vanilla install of letswifi-portal or step-ca.
If you want to dig deep and see exactly how we put certain parts together, we’ve built Ansible tasks to automate the deployment and configuration of this solution and posted them on GitLab. That git repository is specific to Suffield Academy, so it may not run out of the box for others. However, we’ve tried to make it as generic as possible in the time we have. At the very least, they provide a highly-detailed set of instructions for replicating our install that you can read and learn from. We also publish our fork of letswifi-portal with the changes described in this document. Most of our changes are housed on feature branches, so make sure to check those branches rather than the default upstream branch. If there are any private config files that you’re interested in, just ask and we can provide anonymized sources.
This post is long (almost 10,000 words!); feel free to jump to the sections that interest you if you’re here to learn about a specific part of the solution. However, we suggest you read through linearly to see how the pieces all fit together.
- Part 1: Introduction and background
- Part 2: Solution overview
- Part 3: Linux and Apache
- Part 4: BYOD with letswifi-portal and geteduroam
- Part 5: MDM with step-ca and SCEP (and custom webhooks)
- Part 6: Care and feeding
Introduction and background
Why EAP-TLS?
Like many schools (especially those in higher education, though we are K-12), we use eduroam as our primary campus wireless network. This allows our users to authenticate at hundreds of other sites around the world using the same credentials as when they’re on our campus.
Eduroam requires 802.1X authentication back to a RADIUS server on our campus. There are several subtypes for 802.1X, but we’ve settled on EAP-TLS. This method relies on digital certificates to mutually authenticate users to our RADIUS server. There are several benefits to certificate auth:
-
Credentials are “minted” for a user and then remain stable. If a user changes their password, they don’t need to update their settings to stay connected to the network.
-
Leveraging public-key crypto in certificates means that no secrets are ever transmitted over the wire. The private key data always remains on the device.
-
Certificates cannot be altered after creation, so the information they transmit about the user can be verified and trusted.
However, certificates have some drawbacks:
-
They need to be generated by a trusted source and then transmitted and installed on the user’s device. Compared to passwords (which users can just type in for themselves) this is more of a hassle.
-
They expire (eventually). Once again, replacement certificates need to be generated and installed when they get past their expiration date.
-
Certificate trust is tricky. Leaf, intermediates, and roots? Which need to be stored on the device? Which are transmitted on the fly? This issue affects most EAP types (not just EAP-TLS) because certificates are typically used to encrypt the traffic to the RADIUS server (even if you’re using a password-based type like TTLS). However, using certs for the client can muddle the picture even more.
Tools to support EAP-TLS
There are two big pieces that you need for a successful EAP-TLS deployment. A private PKI infrastructure (to generate certificates), and onboarding software (to deploy those certificates onto devices).
Several commercial vendors offer products that fill these roles, such as SecureW2, Clearpass, and Cloudpath. They may offer other features as well. We used one for several years, but grew tired of paying for what we were using it for (PKI and onboarding). We knew we could handle the PKI if we tried, but onboarding was a challenge (keeping up to date with requirements for different operating systems).
Eduroam CAT had existed for several years and handled the onboarding piece, unless you used EAP-TLS. The issue was that the per-device nature of certificates made it hard to have a centralized tool. The other EAP types allowed you to push out a generic config for your institution and then the user filled in their password to finish the process. With certs there are no passwords, so there has to be a unique process to get a cert to the device.
Luckily for us, a new project came along to solve this exact problem: letswifi-portal, and its companion onboarding tool geteduroam. Letswifi was built specifically to authenticate users using credential they already used at their institution, and then present them with a certificate they could use for EAP-TLS. Geteduroam walks the user through this authentication process and then installs the downloaded cert for them so they are ready to go. Thus, PKI and onboarding are handled!
However, there was one piece missing for us. We utilized MDM to manage school-owned devices. Letswifi works well for a BYOD model, as users can provision their own certs interactively. For managed devices, it would be a pain to have to authenticate each one; we’d rather automate device enrollment. Our MDM supports using SCEP to generate certificates, so we wanted that in our solution. Letswifi doesn’t (yet) provide this, so we needed something else.
After some research (and AI suggestions), we found our answer in step-ca. It’s an open-source Certificate Authority server that supports SCEP for certificate enrollment (as well as many others). By running this alongside letswifi-portal we now had a path for both BYOD and MDM enrollments.
We combined this all together on a single machine that can handle our needs. Additionally, we integrated step-ca as the CA backend for letswifi. This is an important detail; right now letswifi is designed to be standalone and handle its own crypto. We changed it to use step-ca so we only had one crypto source to deal with, and also so that we could centralize our certificates in a single database for access control and audit.
Finally, we built a custom webhook integration for step-ca that allows us to enrich the certificate details with information from our systems, as well as store them in a database under our control. This gives us a lot of flexibility on the RADIUS side to authenticate users.
Solution overview
Software architecture
This diagram shows the various components and how they interact. The components in the shaded box are the ones we will be discussing in this document. The others are external and assumed to already be up and running.
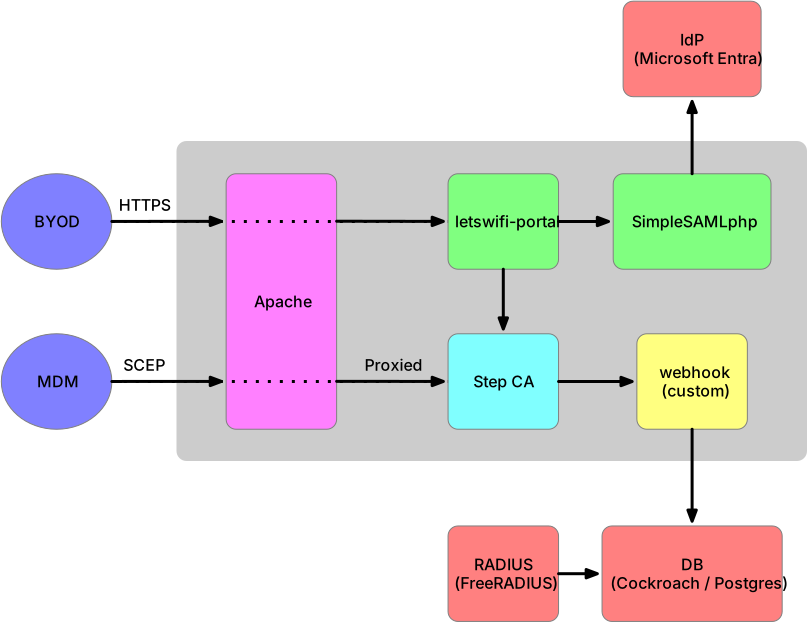
Clients can connect in one of two ways:
-
BYOD clients connect using a web browser and/or the geteduroam client to walk them through the web-based workflow presented by letswifi-portal.
-
MDM clients can use SCEP to provision a certificate using a shared-secret challenge, bypassing interactive authentication. As of this writing, the open-source version of step-ca only supports static SCEP challenges.
Letswifi has a dependency on SimpleSAMLphp, relying on it to act as a proxy between letswifi and the IdP for the institution (such as Microsoft Entra). This way, letswifi doesn’t need to reimplement code to communicate with the IdP.
Letswifi doesn’t natively support SCEP, so we use step-ca, which provides this functionality. Step-ca runs its own web server and could be on its own machine, but we have elected to run it on the same machine and have Apache proxy requests to it so we only expose the features that we need (mainly SCEP).
Normally, letswifi is capable of signing its own certificates from a configured CA. However, since we’ve got step-ca installed already we are going to leverage it to do all the certificate signing. This is helpful, because step-ca can be configured to call out to a webhook when it is time to issue a certificate. We are using this interception point to save details about the certificate into a database so that we can use it for EAP-TLS auth later. By funneling letswifi through step-ca, we get the benefit of logging its certificates as well without having to write a second custom db adapter for letswifi.
Note that step-ca is shown having a dependency on our external database. This database is distinct from the one used for cert storage and RADIUS. Step-ca uses a database to store configuration details as well as information about issued certs. Normally this is stored on the local filesystem but for production installations they recommend configuring an external database.
A note about why we’re storing the certificate data in a database. We have opted to create privacy-preserving certificates for EAP-TLS. That means the certificates do not have any personally-identifying information in them, but instead a randomly-generated UUID. This requires the use of a database to lookup the true identity of the user, which is why RADIUS communicates with the database used by our system. Essentially, the webhook stores the user information available at the time of issuance and associates it with the UUID in the database. The rest of the system doesn’t store any PII.
Crypto infrastructure
There is no way to adequately describe the background and nuances of public-key cryptography in this document. The folks who created step-ca wrote a great primer on the subject that we recommend. Below we’ll try to outline the basics of our approach, but we assume you know about root CAs, intermediate CAs, and leaf certificates.
The main thing to know about certificates is that they rely on the notion of trust. A certificate can sign another certificate, thus “vouching” for it. When another device sees a certificate, it can look to see who signed it; if the signer is trusted, then the certificate it signed can be trusted as well. In EAP-TLS, this trust must be established in both directions: the RADIUS server must be able to verify that a client certificate was (ultimately) signed by a trusted certificate, and the client will also check to confirm that the RADIUS server has a certificate that the client trusts. The chain of trust for each does not need to be identical, but it can be.
We offer a maximum validity period of 5 years on our client certs. Because we’re a high school, this length of time works well for students (they’ve graduated before the certs expire), and the hassle of renewing for everything else is relatively infrequent. The timeframes for our other certificates flow from this 5-year maximum. If you have a different timeframe for your user certs, you’ll likely want to change the other times as well.
Important note: PKI isn’t “set it and forget it”. Because the certificates expire after a period of time, you do need to replace them periodically. See our Care and feeding section below to learn more about that.
Below are the timeframes we use for our certificates; your requirements may differ! Also, you’ll note that we set our lifetimes to be a little more than a whole year amount. This is to allow some slop in the rollover date (the last thing you want is to have a single day when all your cert changes need to be made!).
Root CA (offline, 29.25-year lifetime)
The root forms the anchor of the trust chain for all certificates. We generate it with a long lifetime and keep it in a secure location (not on the box running the software). It only needs to be trotted out every 2 years or so to sign a new intermediate CA (see below).
We’ve opted for ECDSA P-256 certificates, which are newer than RSA. These should work for modern clients, and as a bonus they are smaller than RSA certs which reduces the amount of EAP packets to exchange during authentication.
Intermediate CA (online, 7.25-year lifetime)
The intermediate CAs are the ones that actually sign end-user certificates. We generate them with a lifetime that allows us to use them for 2 years before moving to a new one: 7 years (because the leaf certs have a maximum lifetime of 5 years, 7 - 5 = 2, leading to our rotation time).
Like the root CA, these are ECDSA P-256 certificates.
RADIUS server leaf (2.25-year lifetime)
In EAP, the server must authenticate itself to the user in addition to the user authenticating itself to the server (mutual authentication). Thus, the RADIUS server cert must descend from a certificate chain that the user device trusts. You can use public CAs (e.g., Let’s Encrypt) for this purpose if you want, or you can sign a cert using the private PKI chain described here.
Both of these approaches are valid. We’ve opted to self-sign the certificates because that gives us control over the process and there is no need for a public CA (the certificate trust must be explicitly configured on the client, so public/private doesn’t matter in this regard). Private also allows longer lifetimes (2 years), whereas some public CAs have 60-day (or less) lifetimes. Due to details of our RADIUS environment, automating cert renewals is more of a hassle than with vanilla web servers.
Note that the RADIUS server should be configured to serve both its leaf certificate and intermediate as part of the TLS handshake. That way, the clients only need to store and trust the root CA, and will not be affected when the intermediate CA rotates.
SCEP decryptor leaf (2.25-year lifetime)
SCEP enrollment (as of this writing) requires RSA certificates as part of the process. We could build our entire CA chain out of RSA keys, but step-ca has provided a workaround. We can build a special RSA “SCEP decryptor” certificate and step-ca will use that for SCEP while keeping the rest of the chain ECDSA. It does not need to be publicly trusted, so we can generate it from the private PKI here.
Note that it is fine to have leaf certificates that are RSA even though the signing CA is ECDSA.
User EAP leaf certificates (5-year maximum lifetime)
Finally, these are the certificates that are issued to end-user devices for authentication. They can be ECDSA or RSA, depending on client support (for example, macos only requests RSA certs when using SCEP).
As noted above, we embed a random UUID in the certificate and store that in our database so we can retrieve user details later during the authentication process.
Your RADIUS server must be configured to accept these certificates. This means including the root and intermediate CAs in the RADIUS configuration so the server can build a complete trust chain leading to the user certs.
No certificate revocation lists (CRLs)
A quick note on CRLs. Step-ca does not enable them by default in the open-source edition, though they do provide instructions on how to do so if desired. We considered implementing it, but decided against it for the following reasons:
-
We are storing cert details in a database, which is consulted every time authentication occurs. If we want to deny a user access in real time, we can just flag the cert as disabled in the database. This provides faster and more reliable “revocation” than using a CRL. (If you want to use your certs with a system that doesn’t consult a database, then this assumption may not hold.)
-
A CRL doesn’t really help clients to validate the server certificate. In order to use the CRL, the client must be online, but when the user is authenticating to the server they aren’t online yet. By the time a user is online, they’ve already finished communicating with the RADIUS server, so the time to evaluate trust has passed.
-
We are only using our PKI for EAP-TLS auth. Thus, a compromise of a certificate does not affect other components (like web sites).
Linux and Apache
We use a Debian 13 (Trixie) container as our base OS for letswifi-portal. With the addition of the step-ca repository, all software is either packaged in the OS or available via git.
Our Ansible main task file contains a list of software packages that we used for the base install. Some other packages are installed in specific task files to support that specific application, but these are the packages shared by multiple tasks.
Our Ansible install tasks for Apache, covers all the details of setting up Apache. This includes installing the required modules for PHP, proxying, etc, and installing the templated configuration files.
Our Apache configuration is a little more complex than for just
letswifi, as we need to proxy SCEP requests to step-ca. We’ve built
upon the letswifi sample config; below is a trimmed version of our
complete apache site
template,
showing only the options relevant to letswifi and step-ca. You’ll
need to configure logging, TLS, and other standard options (we use
md to handle procuring a Let’s Encrypt certificate, for example).
<VirtualHost *:80>
    ServerName {{ site_name }}.{{ domain_name }}

    # Safe redirect (mod_md will bypass for ACME challenges)
    RewriteEngine On
    # Ensure ACME challenge works on HTTP
    RewriteCond %{REQUEST_URI} !^/.well-known/acme-challenge/
    # Default to redirecting all requests over TLS
    RewriteRule ^.*$ https://%{HTTP_HOST}%{REQUEST_URI} [R=308,QSA,L]
</VirtualHost>

<VirtualHost *:443>
    ServerName {{ site_name }}.{{ domain_name }}

    DocumentRoot {{ letswifi_portal_install }}/htdocs

    SetEnv	SIMPLESAMLPHP_CONFIG_DIR	{{ simplesaml_config }}
    SetEnv	LETSWIFI_CONFIG_DIR     	{{ letswifi_portal_config }}

    SSLEngine on

    # enable HTTP/2, if available
    Protocols h2 http/1.1

    SSLProxyEngine On
    SSLProxyCACertificateFile {{ stepca_config }}/certs/root_ca.crt
    ProxyPreserveHost On
    RequestHeader set X-Forwarded-Proto "https"

    # Pass select urls through to step-ca:
    # health endpoint for monitoring
    ProxyPass /health https://{{ stepca_listen }}/health
    ProxyPassReverse /health https://{{ stepca_listen }}/health
    # SCEP
    ProxyPass /scep https://{{ stepca_listen }}/scep
    ProxyPassReverse /scep https://{{ stepca_listen }}/scep

    <Directory {{ letswifi_portal_install }}/htdocs>
        # permit letswifi to access auth headers
        CGIPassAuth On
        Require all granted
    </Directory>


    Alias /simplesaml {{ simplesaml_install }}/public

    <Directory {{ simplesaml_install }}/public>
        Require all granted
    </Directory>


    Alias /{{ stepca_certhook}} {{ certhook_install }}/public

    <Directory {{ certhook_install }}/public>
        Require all granted
		RewriteEngine On

	    # map all requests under this directory to the script by default
	   	RewriteCond %{REQUEST_FILENAME} !-f
		RewriteCond %{REQUEST_FILENAME} !-d
		RewriteRule ^ index.php [L]
    </Directory>

	# Logging and other options here
</VirtualHost>

# Global / TLS settings here
You’ll note that there are directives detailing with the four main pieces of web software in the solution:
- letswifi-portal
- SimpleSAMLphp (required by letswifi)
- step-ca (via reverse proxy)
- our custom webhook (doesn’t need to be on this machine, but makes sense for our use case)
BYOD with letswifi-portal and geteduroam
Letswifi supports a workflow where a user must authenticate through an identity provider, and then will be granted access to mint a new cert and download it to their machine (possibly being wrapped in a profile to assist with installation).
SimpleSAMLphp
Letswifi uses SimpleSAMLphp in order to communicate with your desired identity provider (IdP) to authenticate users. SimpleSAMLphp has lots of features, and so it can seem overwhelming at first since letswifi only uses a subset of those features.
SimpleSAMLphp (hereafter, “SSP”) presents itself to letswifi as a Service Provider (SP). An SP represents a “service” or application for others to use. It is like a “gatekeeper” in that it determines who can use the service. However, it does not have any user information of its own. Instead, it contacts an Identity Provider (IdP) for authentication, and then trusts the data provided by the IdP. Thus, we must configure parts of SSP to define a “service” that letswifi can consume.
Letswifi uses SSP like a library so it doesn’t have to handle the SAML authentication stuff on its own. In this scenario, SSP is being set up in a relatively simple way: we are defining a single SP that goes with letswifi-portal, and then passing all authentication requests to a single IdP (in our case, Microsoft Entra). Thus, SSP is also acting as a client application to the IdP, and this requires a separate set of configuration options.
Because SSP is intended to be flexible for use in many projects, it can be a little confusing to know what to set up. Just remember that SSP is acting as both a service and a client in this solution, so we’re going to configure multiple parts.
We used the following for inspiration:
https://nathansenblog.wordpress.com/2021/02/23/azure-ad-single-sign-on-with-simplesamlphp/
Our Ansible SimpleSAMLphp task file shows all the details, but here are the main steps:
Pick an entityId
First, you’ll need to create an entityId for your SSP service provider. That’s a fancy way of saying: make an ID that is globally unique. The examples typically use a URL (so we did too), but it’s important to know that this id doesn’t need to resolve or be served by any software; it just needs to be unique. More guidance is available for picking an entityId.
If you’re using our Ansible tasks, set the simplesaml_sp_entity_id
variable to the entityId you’ve selected.
Configure your IdP
Next, we need to define the IdP so we can point SSP to it. In our case, Microsoft Entra is our IdP, so this next bit will be specific to that (you can use any service that provides a SAML endpoint). In M365 Entra ID, go to “Enterprise Applications”. Choose “New Application” (plus sign). There isn’t a pre-existing app, so choose “Create your own application”. Choose “Non-gallery” as the app type and name it (e.g., “letswifi-portal”). Confirm and create the application.
This should bring you to the application’s overview. Down the left side there should be an option for “Single Sign-On”. Under that section, it should ask you what kind you want. Choose “SAML”.
Skip down the page a bit to where it says “SAML Certificates”. There should be a field marked “App Federation Metadata URL”; copy its contents.
If you’re using our Ansible config, paste the URL in for the definition of
simplesaml_idp_url.
Configure metadata
It’s possible to set everything up statically for testing, but there is a neat hack that you can use to help. SAML endpoints publish a metadata file so that software like SSP can download and autoconfigure themselves using it.
Our Ansible tasks will use the IdP URL to configure the SSP metadata auto-fetcher, and then run a fetch right away. This populates the rest of the config so you can test it. If you need to do this manually, we based our tasks off of the SSP docs:
https://simplesamlphp.org/docs/contrib_modules/metarefresh/simplesamlphp-automated_metadata.html
Once you’ve fetched the metadata from the IdP, that will include the
“entityId” for the IdP (note that this is not the one you made up
earlier for your site; this is the one representing the IdP). That
value in turn must go into authsources.php (Ansible does this for
you if you populate the simplesaml_idp_entity_id variable).
If you’re building this incrementally, you should complete your web server configuration (if not already done) so you have SSP running on your site at:
https://letswifi.example.org/simplesaml/module.php/admin/
Ansible generates a random salt and admin password; if not done you’ll
need to do that per SSP’s documentation. You can use admin as the
username and the static password to get to the admin site.
Once logged in, go to the “Federation” tab and you should see the generated information for your SP. Here you can download the XML for the SP and save as a file on your computer.
Then, go back to the Entra admin page and click “Upload metadata file”. Upload the SP XML file you just downloaded from SSP and it will pre-fill the configuration fields in Entra for you. Once done, you should be given the opportunity to test your application from the Entra side. This basic test just ensures that the IdP login redirect is ready to use.
Make sure you have users assigned to the Enterprise Application or you won’t be able to sign in!
If that succeeds, move on to the next step.
Test SSP configuration
Finally, you can use the “Test” button in SSP admin to try out the connection to the IdP. You will be redirected to your IdP to log in, and if successful, SSP will display an info page with all the data you’re getting back from your IdP. This should include some unique identifier (like email or object id), and may include others (such as full name). In the case of Entra, you can go to “Provisioning” to customize which attributes are sent and what they are named when they are sent over. This can come in handy later if you want to use these claims for cert issuance.
Whatever attribute you want to use to uniquely identify your users,
copy its id and add it to your authsources.php file.
letswifi-portal
With SSP up and running, we can turn our focus to letswifi. If not
using Ansible, you can follow their INSTALL.md instructions to fetch
letswifi-portal, copy the sample configs, and make customizations.
You should perform the one-time setup of installing dependencies,
making an OAuth “secrets” file, initializing the sqlite database, and
owning the appropriate directories to your web server user.
Our Ansible letswifi task file takes care of this one-time setup, as well as merging the final config files.
CA imports
Letswifi validates its certificates when it performs crypto operations (like signing certs or profiles). You’ll need to import the root (and in some cases, intermediate) certs that go with any leaf certs that you will use, including:
- The chain of certs that sign your EAP-TLS client certs
- The chain of certs that sign your RADIUS server certs
- The chain of certs that sign the leaf cert that letswifi will use as a “profile-signer” (in our case, this is the same as the web server TLS certificate)
It’s fine to have more certs configured than you need; extras won’t hurt. You can import a cert by running:
letswifi ca import
And pipe/redirect PEM data into that command on STDIN.
Note: as of this writing, version 2.0.0b4 has a bug where letswifi
won’t run if the certs dir is empty. Unfortunately, that means you
can’t run the command above to add a cert to the directory, which
leads to a bootstrapping problem. Just touch a dummy.pem file in
the certs directory until you can run the import, and then you can
delete it after a real cert has been added.
Letswifi will parse the cert and create a file in your configured
certs directory named by the Common Name of the certificate. For
certs that will be used to sign, you must pipe in both the certificate
PEM and private key PEM at the same time. See the official
documentation for examples.
Base and realm configuration
You will need to customize the letswifi.conf.php file for your
institution. There are lots of comments; take it slow and read the
examples. Define yourself as a provider, include details about your
institution, etc. You’ll need to reference your SSP install location,
its service provider name, and the default attributes returned by the
SAML endpoint to use as the unique ID in letswifi.
You’ll need to point to a “realm” based on the domain name of your
institution, and then define the details for that realm either in the
main file or in a sub file under the realms directory.
In the realm config, again follow the commented examples. Here you are defining some parameters for the EAP-TLS process, so pay special attention to:
-
server_names, which must match the name of the cert your RADIUS server is configured to present (this is part of the mutual authentication process). Often, this is a hostname like “radius.example.org”. If the names don’t match, the client will refuse to authenticate. -
trust, which is an array of Common Names of one (or more) CAs that sign the RADIUS certificate. Here again, if the chain of trust from the RADIUS certificate can’t be validated by the client, it won’t authenticate. Normally, you only need one value here: the root CA that signed the RADIUS cert (or that signed the intermediate that signed the cert). You don’t include intermediate certs here; the RADIUS server should be configured to present its leaf cert and any intermediates (but not the root), and this config fills in the last missing piece (the root itself). If you are transitioning between roots with some overlap, you will have both listed here simultaneously (so clients can use either).
Testing
If you are using letswifi standalone (not integrated with step-ca as described below), you should be able to test it at this point. Browse to its webhost and choose “manual” configuration. You should be redirected to your IdP to log in, and then a PKCS12 bundle should be downloaded. You can inspect it using the following (if prompted for a password, just hit enter for a blank, or try “pkcs12” as the password):
openssl pkcs12 -info -nokeys -in ~/Downloads/{{bundle_name}}.p12
You should see the cert and root (and possibly intermediates) in PEM format, with headers showing the basics for each one. If you want to extract the cert to verify:
openssl pkcs12 -in {{bundle_name}}.p12 -clcerts \
-nokeys -out {{bundle_name}}.crt.pem

openssl x509 -in {{bundle_name}}.crt.pem -text
If that looks good, you can try to import that certificate on a client, or use one of the other downloads (e.g., a .mobileConfig for macOS/iOS) to test. Note that your RADIUS server must be configured with the roots and intermediates for the signing chain for the client certs!
Eduroam CAT and geteduroam
In addition to downloading certs directly from the web instance, there is a client app called “geteduroam” that can talk to the website directly and install the downloaded profile on the users machine. For macOS/iOS this isn’t really needed (the .mobileConfig profiles work great), but for OSes like Android, it cuts way down on the complexity of the install.
Geteduroam is a generic app that is already built and distributed on various app stores. The way it “discovers” your letswifi instance is through the eduroam CAT program.
Eduroam CAT
Eduroam CAT (Configuration Assistance Tool) is an onboarding app similar to geteduroam. Eduroam administrators publish profiles on the CAT web site, and CAT uses them to set up user machines.
Alas, CAT doesn’t support EAP-TLS (just other forms of EAP that have more generic configs). That’s why geteduroam was created. However, geteduroam uses the CAT profile to “find” your institution, so we still use it even though they are two different programs.
In the CAT web interface, create a profile for your institution. Fill in the relevant details (location, contact, etc). All of the EAP settings will be ignored (they’re only used by CAT). However, there is a special Redirect URL field. Here you should put the full URL to your letswifi instance, plus “#letswifi” at the end. For example:
https://letswifi.example.org/#letswifi
Geteduroam knows to look up your CAT profile, find the redirect URL, and follow it to your instance to compete the onboarding process.
Once the profile is set, you should be able to download geteduroam onto a device and onboard a machine using the app.
As mentioned above, the app isn’t required, but can help with operating systems that don’t have a simple profile installer. You should decide which methods to recommend to your users.
MDM with step-ca and SCEP (and custom webhooks)
Non-standard install warning
This section discusses augmenting letswifi-portal with a second piece of software called step-ca. We do this to add SCEP capabilities for provisioning certificates. If you don’t need SCEP, you should not follow this portion of the configuration, and can rely on vanilla letswifi-portal for BYOD provisioning.
Rationale and design decisions
Letswifi allows users to provision certificates for themselves by first authenticating to an IdP. This works well for BYOD, but is not feasible for MDM solutions as they generally cannot complete an IdP login. Many MDMs support SCEP enrollment, where a URL and shared secret are provided in a configuration profile, and the client uses that to bootstrap their own cert (the MDM does not provide the cert directly).
We discovered an open-source project that did what we needed: step-ca. It acts as a CA to sign certificates and has a built-in web server that can handle SCEP requests. (It also handles several other provisioning types, but we aren’t using them at this time.)
So we have something that handles SCEP. That’s the good news. However, this complicates things. Because step-ca creates its own private PKI infrastructure, merging it with letswifi means one of a few possibilities:
-
Keep them completely separate: Letswifi and step-ca each have their own root/intermediate chain. This means minimal coordination for the configuration, but it means the RADIUS server must have both chains installed in its trust store. It also means rotating twice as many CAs when they expire, and other duplicated effort.
-
Share the intermediate CA from step-ca to letswifi: Here, step-ca “owns” the root of the PKI infrastructure. Every time we make a new intermediate, we copy it over to letswifi so it can use it as well. This reduces duplication and makes for one PKI anchor for the whole system. However, letswifi and step-ca still issue their own certs, which means you must make sure each is configured with the same cert settings for consistency.
-
Have letswifi depend on step-ca: Here, we replace some code in letswifi so that it calls out to step-ca to issue the certificates. This means the least amount of duplicated crypto; step-ca owns the entire process. Its very consistent, and has the advantage when you want a single choke point for cert issuance (which we do, because we want to intercept them and store them in a database). The downside is that we must modify letswifi. Fortunately, the letswifi architecture makes it relatively easy to drop in a new issuer, and we’re hoping we can upstream the changes to make it easier for people to use.
Our Ansible file and these instructions will focus on the third method listed, where letswifi is modified to call out to step-ca for all cert issuance.
Installation
Basic concepts
The open-source edition of step-ca is honed to follow a particular usage pattern:
-
ECDSA certs are used by default, but instructions are available to use RSA roots and intermediates if desired (we stick with EC).
-
One root CA cert, which is intended to be kept “offline”, and only used to sign the intermediates.
-
One active intermediate CA cert, which is used to sign leaf certs.
-
No certificate revocation list (CRL) is enabled by default. It can be manually configured, but we have elected not to do so (see earlier in this document for rationale).
-
An “admin provisioner”, which authenticates administrative requests (e.g., to configure other parts of the system).
-
One or more certificate provisioners, which actually issue certs. Many types are supported, but we only use SCEP and JWK (which allows for a CLI command to issue certs directly).
-
Template files are used to influence the resulting signed certificates (e.g., subject name, expiration date, etc).
Furthermore, we treat step-ca as a private resource and do not expose it directly to the internet. Thus, we have it listen on a private loopback so only our local server has access to issue certs. We proxy SCEP traffic to it through our main web server.
Our Ansible stepca task file documents all the nuances of getting step-ca up and running with our recommended configuration. Our steps are a little more convoluted than the quickstart instructions provided by Step, but we do this so that the resulting configuration is explicit. The quickstart instructions get you up and running quickly, but do things like configure all parts of the system to have a single password, which we don’t recommend.
Download
Step-ca makes a repository available for Debian, so we configure that and install the components directly from their repository.
User setup
We have a dedicated user, step, to own all the step-ca files. We
make its home /opt/step-ca and house all files under that path.
Whenever running commands as this user, the environment variable
STEPPATH should be set to the home directory.
Other users
Other users need limited access to portions of the step-ca data, such
as the CA certs (but not the keys!) and passwords to provisioners that
are invoked directly (by letswifi). We keep these in /etc/step-cli
and apply restrictive permissions to keys that should only be read by
a certain user (e.g., www-data).
Initialization
You’ll need to make “password” files ahead of time with nice, long, random passwords in them (see below; the name always starts with “password”). If you don’t, you’ll be prompted interactively.
We begin by using the built-in initialization process provided by
step-ca (remember to set STEPPATH to the directory where the
installation should live, e.g., /opt/step-ca):
step ca init \
--deployment-type=standalone \
--name={{ stepca_name }} \
--dns='[::1]:8443' \
--dns={{ site_name }}.{{ domain_name }} \
--address='[::1]:8443' \
--with-ca-url='https://[::1]:8443' \
--provisioner=admin \
--admin-name={{ stepca_admin_name }} \
--remote-management \
--key-password-file={{ stepca_install }}/secrets/password-root_{{ stepca_root_version }}.txt \
--password-file={{ stepca_install }}/secrets/password-intermediate_{{ stepca_intermediate_version }}.txt \
--provisioner-password-file={{ stepca_install }}/secrets/password-provisioner-admin.txt
You’ll note some placeholders for “versions” of CAs. Since we plan to rotate the CAs, we are going to name everything with a version number so we can keep track of the current certs and so we don’t overwrite anything when we roll over.
You can think of the {{ stepca_admin_name }} as the “username” to
present when making admin requests. You can use a generic name like
“admin”, “step_admin”, or a string like an email address.
This will set up a CA directory structure, along with an admin provisioner. The “remote management” part is crucial; it needs to be set at initialization time (or its a pain to fix later). That’s mostly why we’re running “init”; it scaffolds the admin and management stuff for us.
Database migration (optional)
When “remote management” is used, parts of the CA config are kept in a database instead of JSON files. By default, a Badger database is created, which is meant to be local to the host. If you want these data to live off of the box (for availability, or to share between multiple instances), you’ll need to migrate the database to Postgres or MySQL.
There isn’t great documentation on this, but it turns out Step created a migration program to handle this. You’ll need to build it from their repository and run it:
- Check out the repo: https://github.com/smallstep/certificates.git
- Build it:
go build -o badger-migration ./scripts/badger-migration - Run it:
badger-migration -v2" -dir={{ stepca_install }}/db -type=postgresql -database=<connection url>
You’ll need to pass a connection url that defines the host, user,
password, certs, etc. We use postgres (well, CockroachDB, but it uses
the postgres wire protocol) and define a “service” entry in
.pg_service.conf, so our connection string is simply
service=servicename.
After migration, edit your config/ca.json file and change the db
section to refer to your connection string (should be the same as the
one you used in the migration). Example:
"db": {
  "type": "postgresql",
  "dataSource": "postgresql:///?...connection url params..."
Once you’ve confirmed that step-ca is working with the new config, you
can delete the db directory on the local machine.
Initialize a new root CA
Even though we just did this, we’re going to initialize the root
manually to have full control over the naming, duration, etc. Delete
the existing certs/root... and secrets/root... files. Then:
step certificate create \
--profile=root-ca \
"{{ stepca_name }} Root CA {{ stepca_root_version }}" \
{{ stepca_install }}/certs/root_ca_{{ stepca_root_version }}.crt \
{{ stepca_install }}/secrets/root_ca_{{ stepca_root_version }}_key \
--password-file={{ stepca_install }}/secrets/password-root_{{ stepca_root_version }}.txt \
--not-after={{ stepca_root_lifetime }} \
--kty=EC \
--curve=P-256
Note that if you do want to use RSA instead of EC, change the last two lines to:
--kty=RSA \
--size=4096
Choose your lifetime carefully (see Care and feeding below)! Step-ca wants the time expressed in hours.
Initialize a new intermediate CA
We also need an intermediate to sign the leaf certs. Remove the
certs/intermediate... and secrets/intermediate... files that were
generated by init. The process of generating the new cert is
similar to the root above, though you need to reference the root as
well as the root will sign this intermediate:
step certificate create \
--profile=intermediate-ca \
"{{ stepca_name }} Intermediate CA {{ stepca_intermediate_version }}" \
{{ stepca_install }}/certs/intermediate_ca_{{ stepca_intermediate_version }}.crt \
{{ stepca_install }}/secrets/intermediate_ca_{{ stepca_intermediate_version }}_key \
--password-file={{ stepca_install }}/secrets/password-intermediate_{{ stepca_intermediate_version }}.txt \
--ca={{ stepca_install }}/certs/root_ca_{{ stepca_root_version }}.crt \
--ca-key={{ stepca_install }}/secrets/root_ca_{{ stepca_root_version }}_key \
--ca-password-file={{ stepca_install }}/secrets/password-root_{{ stepca_root_version }}.txt \
--not-after={{ stepca_intermediate_lifetime }} \
--kty=EC \
--curve=P-256
If doing RSA, change the last two lines:
--kty=RSA \
--size=3072
Again, you must pick a lifetime for your intermediate. It must be longer than your leaf certs, but usually not more than half the length of your root.
Once you initialize your intermediate CA, the root key and its associated password should be taken offline. The root’s only job is to sign the intermediates. The reason for the extra step is that a compromised (or lost) intermediate can be replaced by issuing a new one. Clients that have the root cert configured will be able to trust the new intermediates immediately. However, if the root becomes compromised, you have to reconfigure everything. Thus, it’s best practice to keep the root in an air-gapped location and only bring it online when you need a new intermediate.
Symlink files and update fingerprint
The root and intermediate names we create have versioned names, but
the ca.json file uses generic names. Symlink the root cert,
intermediate cert, and intermediate key to their generic names so that
the config always points to the “current” ones.
Also, since we generated a new root cert, we need to update the config file with its info. Run the following:
step certificate fingerprint /path/to/step-ca/certs/root_ca.crt
Edit config/ca.json and update the fingerprint found there for the
root certificate.
systemd service files
To run step-ca as a service, you should create a systemd file to launch it and keep it running in the background. Step provides a suggested service unit file, and we’ve templated it to work with ansible.
Launch the service and ensure that its running correctly. You should
be able to run step ca health and get an ok response.
Provisioners
With the CA set up, we can now enable provisioners to generate certificates.
EAP-TLS template
Provisioners can use templates to define common options or formatting for the resulting certificates. For example, you can pull in parts of the CSR and populate fields in the resulting cert. Or, you can ignore the CSR entirely and use the template to define all the values.
We have created a template that defines a set format for our EAP-TLS certificates. Because we don’t include any private information in the certificate itself (only in our database), the cert files are relatively static.
The template that we
use
is run through Ansible, so that makes the syntax look funny. Step-ca
uses the same template escape characters ({{ and }}) that Ansible
Jinja templates use, so they have to be escaped. So, when you see a
line like:
"notAfter": {{ '{{' }} .Webhooks.{{ stepca_certhook }}.expires | toJson {{ '}}' }}
That’s seen by step-ca as:
"notAfter": {{ .Webhooks.certhook_name.expires | toJson }}
If you examine the template, you’ll see that the subject is static (same for all certs because it’s anonymous), and the lifetime and UUID are populated from our webhook (discussed below).
The “if” statement allows this template to apply to both RSA and ECDSA certs, depending on what the client requested (the signing options are slightly different for the two types).
JWK (for CLI)
The JWK provisioner type presents a web endpoint that allows clients to fetch a bearer token and generate a certificate. We don’t bother with that; the step CLI will automatically use this provisioner type and populate the request with command-line options. So, this will be the basis for our “BYOD” provisioner, as we’ll have letswifi call step on the command line to make certs.
To configure a JWK provisioner named “byod”:
step ca provisioner add byod \
--type=JWK \
--x509-template={{ stepca_install }}/templates/eap-tls.tpl \
--x509-max-dur=43920h \
--create \
--admin-provisioner=admin \
--admin-password-file={{ stepca_install }}/secrets/password-provisioner-admin.txt \
--admin-subject={{ stepca_admin_name }} \
--password-file={{ stepca_install }}/secrets/password-provisioner-byod.txt \
--disable-renewal \
--disable-smallstep-extensions \
--ssh=false
Note the max lifetime; if this isn’t set the step default of 1 day(!) is enforced, regardless of what is specified in the template.
You’ll need to generate a random password for the provisioner and store it in the named file. The “admin” options should correspond to your selections when you initialized step.
We turn off renewal, SSH certs, and smallstep metadata as they are not used in our workflow.
SCEP
SCEP provisioners are similar, but have an extra step. The SCEP protocol was only written with RSA keys in the spec. Our CAs use ECDSA keys. Step provides a workaround by allowing us to generate a RSA leaf cert and have it use that for the SCEP negotiation.
To generate this “SCEP Decryptor” cert, we’ll create a new leaf. We’re lazy and don’t want to make a whole template just for this, so we issue the cert and sign it directly off of the intermediate (note that this is not a “ca” command). This bypasses all CA restrictions and lets us set the lifetime and other parameters directly.
The subject name of the certificate is arbitrary; we embed the provisioner name and host along with a generic “MDM SCEP DECRYPTOR” string so we recognize it on the client. Note that the intended provisioner will be named “mdm”, so that influences the names:
step certificate create \
"MDM SCEP DECRYPTOR mdm ({{ site_name }}.{{ domain_name }})" \
{{ stepca_install }}/certs/scep-decryptor-mdm.crt \
{{ stepca_install }}/secrets/scep-decryptor-mdm_key \
--kty=RSA \
--size=2048 \
--not-after={{ stepca_scep_decryptor_lifetime }} \
--profile=leaf \
--ca={{ stepca_install }}/certs/intermediate_ca.crt \
--ca-key={{ stepca_install }}/secrets/intermediate_ca_key \
--ca-password-file={{ stepca_install }}/secrets/password-intermediate_{{ stepca_intermediate_version }}.txt \
--no-password \
--insecure \
--force
With this decryptor cert ready, we can create the provisioner that references it. We’ve named this provisioner “mdm”; it uses similar options as the JWK provisioner with some additional SCEP-specific bits:
step ca provisioner add mdm \
--type=SCEP \
--x509-template={{ stepca_install }}/templates/eap-tls.tpl \
--x509-max-dur=43920h \
--admin-provisioner=admin \
--admin-password-file={{ stepca_install }}/secrets/password-provisioner-admin.txt \
--admin-subject={{ stepca_admin_name }} \
--password-file={{ stepca_install }}/secrets/password-provisioner-mdm.txt \
--disable-renewal \
--disable-smallstep-extensions \
--ssh=false \
--scep-decrypter-certificate-file={{ stepca_install }}/certs/scep-decryptor-mdm.crt \
--scep-decrypter-key-file={{ stepca_install }}/secrets/scep-decryptor-mdm_key \
--challenge={{ challenge }}
Note the --challenge option. This is a shared secret that must be
provided by all SCEP clients. Typically, your MDM would provide a
field to enter this value, and it will instruct the client to use it
when requesting a certificate.
Webhook
The base provisioners will allow certificates to be created after executing the steps above. However, we added one more layer to our solution: a webhook. This webhook is called by the provisioner just before it issues a certificate. It is meant to allow “enrichment” of the certificate data; we use it to format portions of the certificate like expiration date. However, we also (ab)use it to capture data from the certificate request and log it to a database. By having this callback point, we’re able to see data about every certificate that is issued.
Webhook authoring
The webhook receives an application/json encoded payload with data from the CSR. It must return a JSON object that, at a minimum, contains the key “allow” with a value of “true”. If it does not, the webhook is deemed to have failed and no certificate will be issued.
Any additional JSON keys in the object are available to the
certificate template by using the format
.Webhooks.<webhook_name>.<key>. The webhook name is set when
configuring the provisioner (see below).
In this way, you can return arbitrary values for the certificate. They can be based on the input values, or they can be completely generated by the webhook (we do this to create a random UUID).
And, as a side effect, you can log any input values as well.
For an example of a webhook, see our letswifi-certhook repository. The logic is unlikely to apply to your organization, but you will see how we parse the incoming request and form a response, as well as stash the request data into a database.
step-ca configuration
Once the webhook is set up to answer at a URL, you can add it to a provisioner with the following. This works for any provisioner type; we demonstrate with the “byod” name, but it could also be applied to the “mdm” provisioner:
step ca provisioner webhook add byod
{{ stepca_certhook }} \
--url=https://{{ site_name }}.{{ domain_name }}/{{ stepca_certhook }}/byod \
--admin-provisioner=admin \
--admin-subject={{ stepca_admin_name }} \
--admin-password-file={{ stepca_install }}/secrets/password-provisioner
A webhook must be added with a name, that’s what {{ stepca_certhook }} is in the example above. The name is needed because it is
possible to add multiple hooks to a single provisioner. We also embed
the provisioner name in the URL to the webhook so we know who called
it, but this is not required (a single hook can be shared between
provisioners if the logic is the same).
When the add completes, you will be given a UUID and shared secret from step-ca. You can use this to further authenticate webhook requests. In our case, we opted to restrict by host IP instead.
Letswifi integration
Finally, we must instruct letswifi to call out to step-ca instead of using its own crypto calls to sign the certificates. We have a branch on our fork of the letswifi-portal repository with two changed files:
The “log” file is needed because of the way letswifi-portal is architected (it’s kind of like a factory that creates the issuer). At this time, ours omits some functionality (mostly related to admin functions); since step-ca is in charge we deemed this acceptable as we don’t want letswifi to have direct cert manipulation capability.
The “issuer” is where the magic happens. The crucial bit is where it
calls step to mint a certificate, passing in data from the IdP as
--san= fields that will be read by our webhook:
$argv = [
         'step',
         'ca',
         'certificate',
         'letswifi',
         $crtFile,
         $keyFile,
         '--provisioner=byod',
         '--provisioner-password-file=/etc/step-cli/secrets/password-provisioner-byod.txt',
         '--console',
];

// convert IdP claims to san attributes
foreach ($claims as $key => $value) {
    // claims are always returned as an array;
    // only take first item
    $argv[] = '--san=' . $key . ':' . $value[0];
}
Note that letswifi is run by the web server, so that user (e.g.,
www-data) needs to have access to the provisioner password. Note
that in the example above, it lives in /etc/step-cli; the password
file should have permissions set to only allow reading by the web
server user.
With the hook in place and tested, certs generated via BYOD or MDM should how pass through the hook for enrichment and/or logging before they are issued.
Care and feeding
With all the steps above finished, you should have a functioning BYOD and MDM certificate solution!
While the system should roll along nicely after that, there is some periodic maintenance to be aware of.
PKI
One important thing about certificates is that they expire. This applies to all the certificates in your chain: the root, the intermediate, and the leaf.
This means that you need to roll over your certs periodically. However, it’s a little more complicated than it might sound at first. Your root and intermediate CAs can’t sign certs beyond their own lifetime, so you must roll them over before you get too close to their expiration.
Thus, discontinuance times flow from the leaf certs. Your maximum leaf determines your minimum intermediate, and your maximum intermediate determines your minimum root.
To make things a little more interesting, you must also consider that established clients likely will not receive new root certificates to trust. That means you must roll over your root certificate early enough so that you have time to configure the new root on new clients for a time before you cut over and break old clients (ideally, this happens when all the old clients have expired and aged out).
We created a quick perl script to make it easier to visualize the impacts that different cert lifetimes had on rollover events. The sweet spot for us was issuing a new intermediate every two years. This prevented us from having to issue a new intermediate every single year, but kept the intermediate short enough that we didn’t have to roll the root over way ahead of its lifetime. Here’s a shortened run from the script showing what the events look like:
         Root CA max lifetime: 29
 Intermediate CA max lifetime: 7
Leaf certificate max lifetime: 5

2026:
     New root r01 2026-2055
     r01 signs new int i01 2026-2033
     i01 signs server, leaf, and scep
2027:
     i01 signs server, leaf, and scep
2028:
     r01 signs new int i02 2028-2035
     i02 signs server, leaf, and scep
2029:
     i02 signs server, leaf, and scep

... same two-year pattern until ...

2046:
     r01 signs new int i11 2046-2053
     i11 signs server, leaf, and scep
2047:
     i11 signs server, leaf, and scep
2048:
     New root r02 2048-2077
     r02 signs new int i12 2048-2055
     i11 signs server
     i12 signs leaf and scep
2049:
     i11 signs server
     i12 signs leaf and scep
2050:
     r02 signs new int i13 2050-2057
     i11 signs server
     i13 signs leaf and scep
2051:
     i11 signs server
     i13 signs leaf and scep
2052:
     r02 signs new int i14 2052-2059
     i11 signs server
     i14 signs leaf and scep
2053:
     Remove old root r01
     i14 signs server, leaf, and scep
It’s pretty predictable until you get to the first root rollover (2048). At that point, we have to sign the server certificate on the previous intermediate (because clients configured before this new root can only trust the previous root). Once those clients age out, we can finally start signing with the new intermediate and fully retire the previous root from our configuration.
The same pattern follows until the next root rollover (each rollover is 22 years apart), with a similar overlap time. Fortunately, I plan to be retired long before that second rollover. ;-)
As described above, we can make the special leaf certificates for the radius server and SCEP decryptor on the command line directly without using a template.
Radius Server
Make sure to use the appropriate intermediate CA. If you’ve recently rolled over the root, you’ll need to use the previous intermediate.
step certificate create radius.suffieldacademy.org
/.../radius_server.crt" \
/.../raidus_server_key" \
--kty=EC \
--curve=P-256 \
--not-after=19680h \
--profile=leaf \
--ca={{ stepca_install }}/certs/intermediate_ca.crt \
--ca-key={{ stepca_install }}/secrets/intermediate_ca_{{ stepca_intermediate_version }}_key \
--ca-password-file={{ stepca_install }}/secrets/password-intermediate_{{ stepca_intermediate_version }}.txt \
--no-password \
--insecure
SCEP Decryptor
There are no configuration dependencies for this certificate, so you can always make it from the most recent intermediate. If you’re using our Ansible code, simply delete the SCEP profile and re-run the playbook. The tasks will build a new SCEP profile and generate a new certificate using code similar to below.
If you are doing this by hand, make sure to run step ca provisioner update ... to configure the newly configured cert on the SCEP
provisioner.
Use the “SCEP Decryptor” certificate instructions above to create a new cert.
Public CAs
Double-check public CAs every year to confirm there are no new/expired
roots. This is important if you use public certs as “profile-signer”
certificates in your configuration, which is likely because clients
won’t trust non-public certificates. In this case, you just want to
make sure that you have the root certs for the CA you’re using
installed in letswifi using letswifi ca import, or by adding them to
the special letswifi_portal_public_ca list variable in our Ansible tasks.
Cert database
If you log certificate details to a database (as we have), you may want to periodically perform some tasks on it as well. The database only logs certs when they are created. If a user leaves the organization, their cert should be marked as invalid in the database.
You may want to scan the database every hour or day to find users whose certs should be turned off. You can also fix any incorrect biographical data (e.g., preferred names) that may have drifted since the cert was issued.
Finally, you may want to clear out old/expired certs every once in a while to keep the database from growing without bound. A properly-configured RADIUS server shouldn’t allow certs that are past their expiration date, so they should be safe to remove from the database after this date unless you need them for audit or reporting purposes.
Wrapping up
Wow, you made it all the way to the end?!? ;-) Thanks for reading, and I hope you found it helpful! Feel free to contact me if you have corrections, suggestions, or questions…